m (Too long to be a stub now) Tag: Source edit |
No edit summary Tag: Source edit |
||
| Line 1: | Line 1: | ||
| ⚫ | |||
| − | |||
| − | {{ |
+ | {{Stage |
| − | |image = |
+ | |image = MCM.png |
| − | |world = [[Kremkroc Industries, Inc.]] |
+ | |world = [[Kremkroc Industries, Inc.]] |
| − | |type = Mine Cart |
+ | |type = [[Mine Cart]] |
| − | |theme = Mine Cart Madness |
+ | |theme = [https://www.youtube.com/watch?v=UrKRIQaIlhE Mine Cart Madness] |
| − | |buddies = |
+ | |buddies = None |
|bonuses = 3 |
|bonuses = 3 |
||
| + | |notable = It is a stage where the [[Kong Family|Kongs]] use multiple mine carts to traverse it. When riding the vehicles, the heroes do not jump with the carts, instead they always jump out of the mine carts. |
||
| − | |notable = |
||
| − | |enemies = [[ |
+ | |enemies = [[Gnawty|Gnawties]], [[Necky|Neckies]], [[Zinger]]s, and [[Krash]]es |
| − | |games = ''[[Donkey Kong Country]]'' |
+ | |games = ''[[Donkey Kong Country]]'' |
| + | |first = ''Donkey Kong Country'' (for [[Super Nintendo Entertainment System|SNES]]) (1994) |
||
| − | }} |
||
| + | |latest = ''Donkey Kong Country'' (for [[Game Boy Advance|GBA]]) (2003)}} |
||
| − | '''Mine Cart Madness''' is the fifth stage of [[Kremkroc Industries, Inc.]] in ''[[Donkey Kong Country]]''. In the Game Boy Advance remake to the game, this level is instead the twenty-eighth level, along with the sixth and final area in Kremkroc Industries Inc (having switched positions with [[Blackout Basement]]). |
||
| + | '''Mine Cart Madness''' is the fifth stage of [[Kremkroc Industries, Inc.]] world in the [[Super Nintendo Entertainment System]] and [[Game Boy Color]] versions of the game ''[[Donkey Kong Country]]'', as well as the sixth stage in the same world of the [[Game Boy Advance]] version, having switched positions with [[Blackout Basement]]. In the SNES and GBC versions, it is preceded by [[Poison Pond]], and followed by Blackout Basement. In the GBA version, it is preceded by Blackout Basement, and followed by [[Dumb Drum|Boss Dumb Drum]]. |
||
| + | |||
==Overview== |
==Overview== |
||
| − | This boardwalk |
+ | This boardwalk stage is very similar to the stage [[Mine Cart Carnage]], as it features the rarely found vehicles: [[Mine Cart|mine carts]]. This time, the [[Kong Family|Kongs]] ride the mine carts in the same manner as before, but, when they jump, they exit the cart and are sent into mid-air, unlike in Mine Cart Carnage, where they jump along with the cart. The Kongs must get used to jumping out of their cart independently as many [[Zinger]]s and [[Necky|Neckies]] get in their way. Four [[Gnawty|Gnawties]] also appear in the stage, three of which that are found at the start of the stage and the other at the end of it. Sometimes, the heroes must leave their cart for good and land in a different mine cart, due to their mine cart about to fall into pits. They must sometimes hijack a [[Krash]]'s cart later in the stage to gain access to another cart. |
| − | == |
+ | ==Walkthrough== |
| − | At the start of the |
+ | At the start of the stage, the Kongs must pass or defeat three Gnawties and pass a [[DK Barrel]] along a set of scaffolds, then hop into a mine cart to advance throughout the stage. They are then pulled past a Necky, then another one. Next, the track becomes a dead end and the primates must defeat or pass another Necky and hop into the second mine cart of the stage. [[Donkey Kong|Donkey]] and [[Diddy Kong]] must then nab the letter K between two Neckies and continue along throughout the stage. They can either jump onto the mine cart on the shortcut by climbing up a [[Rope|rope]], which takes them past the Neckies below, or they can take the hard way with Neckies as obstacles. On the secret path, they can collect many [[Banana|bananas]] and enter a [[Barrel Cannon|barrel cannon]] leading to a [[Bonus Stage|Bonus Room]] above them. While on the lower path, they ride over a small ramp that sends them over some of an abyss. After riding through either of the pathways, Donkey and Diddy must hop over a Zinger to go into the next mine cart of the stage. After defeating or passing a Necky, they encounter two more Neckies that they can bounce on to collect the letter O. The heroes must then jump into another mine cart, where they temporarily go upwards and must only avoid a single Zinger to move onto the next mine cart. After this, they must hop into two more mine carts on two short tracks, until they reach a mine cart on a longer track, which leads the duo to the [[Star Barrel]]. |
| − | Halfway throughout the |
+ | Halfway throughout the stage, the Kongs must fall downwards off of the edge of a track to land in a lower area with a DK Barrel and two Neckies that they must jump over or defeat. Then, they encounter a line full of mine carts on short tracks, as well as the letter N after riding in the two mine carts on short tracks. They must then hop into another mine cart to continue throughout the stage. The primates can find a [[Tire|tire]] high up in the air in which they can jump onto to hop into another barrel cannon to a second Bonus Room. They may ignore it and then avoid two Zingers until they reach the deadline of the track. The heroes must then jump onto a tire on a nearby platform, which helps them jump into another mine cart leading between two Zingers. Afterwards, the Kongs must hop onto another platform, avoid a Zinger, and, optionally, collect the letter G with a tire on the platform. |
| − | When the |
+ | When the primates are done doing this, they must hop into another mine cart, which travels a far way downwards until reaching another platform with a tire and a Zinger around it. The Kongs must then hop off this platform and into another mine cart containing a Krash on a short track leading the primates to another two platform with a tire on each. A Zinger on whom the Kongs must avoid is also between them. The heroes must then hop into a mine cart containing a Krash, defeat it, then continue along until reaching another short platform supporting a tire. A Zinger flies to the left of it. The Kongs must then hop off this ledge and into another mine cart containing a Krash on whom the primates must also defeat. The Kongs continue upwards in the mine cart and must avoid a trio of Zingers. They must then hop out of the mine cart and into another mine cart with a Krash in it. They must defeat the Krash and continue along throughout the stage under a Necky, until reaching another small platform supporting a tire with a Zinger circling around it. The Kongs must avoid this enemy and hop far down and into another mine cart with a Krash in it, whom the primates must defeat. The heroes are then lead far up and far down in the mine cart, making an upside-down U-turn. They can hop into a barrel cannon in the middle of the U-turn, found below the exit sign on the track, which leads them to the third and final Bonus Room. They must then finally jump off of the mine cart when they reach the downward part of the U-turn and defeat a Gnawty on a long scaffold. The duo must then hop onto another ledge leading them past the exit sign to the next stage. |
==Collectibles and Secrets== |
==Collectibles and Secrets== |
||
===Minor=== |
===Minor=== |
||
| − | === |
+ | ===[[Banana]]s === |
| − | === |
+ | ===[[K-O-N-G Letters]]=== |
| − | * |
+ | *'''K''': The letter K is found between two Neckies near the second mine cart of the stage. |
| − | * |
+ | *'''O''': The letter O is found in the mine cart after the shortcut and the first Zinger of the stage, above two Neckies. |
| − | * |
+ | *'''N''': The letter N is found after the Star Barrel in an abyss next to a mine cart on a short track. While the mine cart falls into the pit, the primates must stay inside it until collecting the letter, and then quickly jump for the next cart. |
| − | * |
+ | *'''G''': The letter G is found on the first small platform after the second Bonus Room. |
| − | ===Bonus |
+ | ===Bonus Rooms=== |
| − | * At the beginning of the |
+ | *1: At the beginning of the stage, the Kongs must grab the letter K and dodge two Neckies. Afterwards, they begin to ride downwards. There, they must jump up and grab onto a lone rope. Jumping off of it to the right takes them to another mine cart. In the center of the track without bananas, the primates must jump up and land in a hidden autofire barrel off screen, leading them to a Bonus Room, where they must blast through several barrel cannons to grab a few special items, including a [[Animal Token|Rambi Animal Token]]. They can exit the area through the opening at the end of the room. |
| − | * Shortly after the letter N, |
+ | *2: Shortly after the letter N, it is possible to notice a tire floating in the air. The heroes must jump to it when they come by and bounce into the barrel cannon to the right. It shoots them to another Bonus Room, where they must hit three barrels so the images of Animal Tokens displayed on them all match. Once this is done, they are awarded with an Animal Token chosen during the challenge. |
| − | * Upon |
+ | *3: Upon entering the final mine cart, the Kongs must turn around and jump past the track to land on a floating tire. They must use it to bounce to the two next tires and then into a barrel cannon that blasts them to the Bonus Room. There, the they must bounce on another tire on a moving platform to grab many bananas over a wide abyss. The Bonus Room's exit is to their right. |
==Gallery== |
==Gallery== |
||
| + | <gallery></gallery> |
||
| − | ===Super Nintendo Entertainment System=== |
||
| + | |||
| − | ===Game Boy Color=== |
||
| − | ===Game Boy Advance=== |
||
==Videos== |
==Videos== |
||
| + | <gallery></gallery> |
||
| − | ===Super Nintendo Entertainment System=== |
||
| − | ===Game Boy Color=== |
||
| + | {{DKCS}} |
||
| − | ===Game Boy Advance=== |
||
| − | |||
| ⚫ | |||
| ⚫ | |||
[[Category:Stages]] |
[[Category:Stages]] |
||
| ⚫ | |||
[[Category:Kremkroc Industries, Inc. Stages]] |
[[Category:Kremkroc Industries, Inc. Stages]] |
||
| ⚫ | |||
[[Category:Donkey Kong Country Stages]] |
[[Category:Donkey Kong Country Stages]] |
||
| ⚫ | |||
Latest revision as of 04:29, 23 March 2021
| |
| World(s) | Kremkroc Industries, Inc. |
| Type | Mine Cart |
| Music Theme(s) | Mine Cart Madness |
| Animal Buddies | None |
| Bonus Room(s) | 3 |
| Notable Feature(s) | It is a stage where the Kongs use multiple mine carts to traverse it. When riding the vehicles, the heroes do not jump with the carts, instead they always jump out of the mine carts. |
| Enemies Encountered | Gnawties, Neckies, Zingers, and Krashes |
| Game(s) | Donkey Kong Country |
| First Appearance | Donkey Kong Country (for SNES) (1994) |
| Latest Appearance | Donkey Kong Country (for GBA) (2003)
|
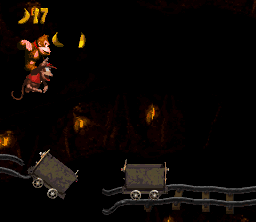
Mine Cart Madness is the fifth stage of Kremkroc Industries, Inc. world in the Super Nintendo Entertainment System and Game Boy Color versions of the game Donkey Kong Country, as well as the sixth stage in the same world of the Game Boy Advance version, having switched positions with Blackout Basement. In the SNES and GBC versions, it is preceded by Poison Pond, and followed by Blackout Basement. In the GBA version, it is preceded by Blackout Basement, and followed by Boss Dumb Drum.
Overview[]
This boardwalk stage is very similar to the stage Mine Cart Carnage, as it features the rarely found vehicles: mine carts. This time, the Kongs ride the mine carts in the same manner as before, but, when they jump, they exit the cart and are sent into mid-air, unlike in Mine Cart Carnage, where they jump along with the cart. The Kongs must get used to jumping out of their cart independently as many Zingers and Neckies get in their way. Four Gnawties also appear in the stage, three of which that are found at the start of the stage and the other at the end of it. Sometimes, the heroes must leave their cart for good and land in a different mine cart, due to their mine cart about to fall into pits. They must sometimes hijack a Krash's cart later in the stage to gain access to another cart.
Walkthrough[]
At the start of the stage, the Kongs must pass or defeat three Gnawties and pass a DK Barrel along a set of scaffolds, then hop into a mine cart to advance throughout the stage. They are then pulled past a Necky, then another one. Next, the track becomes a dead end and the primates must defeat or pass another Necky and hop into the second mine cart of the stage. Donkey and Diddy Kong must then nab the letter K between two Neckies and continue along throughout the stage. They can either jump onto the mine cart on the shortcut by climbing up a rope, which takes them past the Neckies below, or they can take the hard way with Neckies as obstacles. On the secret path, they can collect many bananas and enter a barrel cannon leading to a Bonus Room above them. While on the lower path, they ride over a small ramp that sends them over some of an abyss. After riding through either of the pathways, Donkey and Diddy must hop over a Zinger to go into the next mine cart of the stage. After defeating or passing a Necky, they encounter two more Neckies that they can bounce on to collect the letter O. The heroes must then jump into another mine cart, where they temporarily go upwards and must only avoid a single Zinger to move onto the next mine cart. After this, they must hop into two more mine carts on two short tracks, until they reach a mine cart on a longer track, which leads the duo to the Star Barrel.
Halfway throughout the stage, the Kongs must fall downwards off of the edge of a track to land in a lower area with a DK Barrel and two Neckies that they must jump over or defeat. Then, they encounter a line full of mine carts on short tracks, as well as the letter N after riding in the two mine carts on short tracks. They must then hop into another mine cart to continue throughout the stage. The primates can find a tire high up in the air in which they can jump onto to hop into another barrel cannon to a second Bonus Room. They may ignore it and then avoid two Zingers until they reach the deadline of the track. The heroes must then jump onto a tire on a nearby platform, which helps them jump into another mine cart leading between two Zingers. Afterwards, the Kongs must hop onto another platform, avoid a Zinger, and, optionally, collect the letter G with a tire on the platform.
When the primates are done doing this, they must hop into another mine cart, which travels a far way downwards until reaching another platform with a tire and a Zinger around it. The Kongs must then hop off this platform and into another mine cart containing a Krash on a short track leading the primates to another two platform with a tire on each. A Zinger on whom the Kongs must avoid is also between them. The heroes must then hop into a mine cart containing a Krash, defeat it, then continue along until reaching another short platform supporting a tire. A Zinger flies to the left of it. The Kongs must then hop off this ledge and into another mine cart containing a Krash on whom the primates must also defeat. The Kongs continue upwards in the mine cart and must avoid a trio of Zingers. They must then hop out of the mine cart and into another mine cart with a Krash in it. They must defeat the Krash and continue along throughout the stage under a Necky, until reaching another small platform supporting a tire with a Zinger circling around it. The Kongs must avoid this enemy and hop far down and into another mine cart with a Krash in it, whom the primates must defeat. The heroes are then lead far up and far down in the mine cart, making an upside-down U-turn. They can hop into a barrel cannon in the middle of the U-turn, found below the exit sign on the track, which leads them to the third and final Bonus Room. They must then finally jump off of the mine cart when they reach the downward part of the U-turn and defeat a Gnawty on a long scaffold. The duo must then hop onto another ledge leading them past the exit sign to the next stage.
Collectibles and Secrets[]
Minor[]
Bananas[]
K-O-N-G Letters[]
- K: The letter K is found between two Neckies near the second mine cart of the stage.
- O: The letter O is found in the mine cart after the shortcut and the first Zinger of the stage, above two Neckies.
- N: The letter N is found after the Star Barrel in an abyss next to a mine cart on a short track. While the mine cart falls into the pit, the primates must stay inside it until collecting the letter, and then quickly jump for the next cart.
- G: The letter G is found on the first small platform after the second Bonus Room.
Bonus Rooms[]
- 1: At the beginning of the stage, the Kongs must grab the letter K and dodge two Neckies. Afterwards, they begin to ride downwards. There, they must jump up and grab onto a lone rope. Jumping off of it to the right takes them to another mine cart. In the center of the track without bananas, the primates must jump up and land in a hidden autofire barrel off screen, leading them to a Bonus Room, where they must blast through several barrel cannons to grab a few special items, including a Rambi Animal Token. They can exit the area through the opening at the end of the room.
- 2: Shortly after the letter N, it is possible to notice a tire floating in the air. The heroes must jump to it when they come by and bounce into the barrel cannon to the right. It shoots them to another Bonus Room, where they must hit three barrels so the images of Animal Tokens displayed on them all match. Once this is done, they are awarded with an Animal Token chosen during the challenge.
- 3: Upon entering the final mine cart, the Kongs must turn around and jump past the track to land on a floating tire. They must use it to bounce to the two next tires and then into a barrel cannon that blasts them to the Bonus Room. There, the they must bounce on another tire on a moving platform to grab many bananas over a wide abyss. The Bonus Room's exit is to their right.
Gallery[]
Videos[]