| |
| World(s) | Jungle |
| Type | Jungle |
| Music Theme(s) | Jungle Hijinxs (or DK Island Swing Returns) |
| Animal Buddies | None |
| Bonus Room(s) | 1 |
| Puzzle Pieces | 5 |
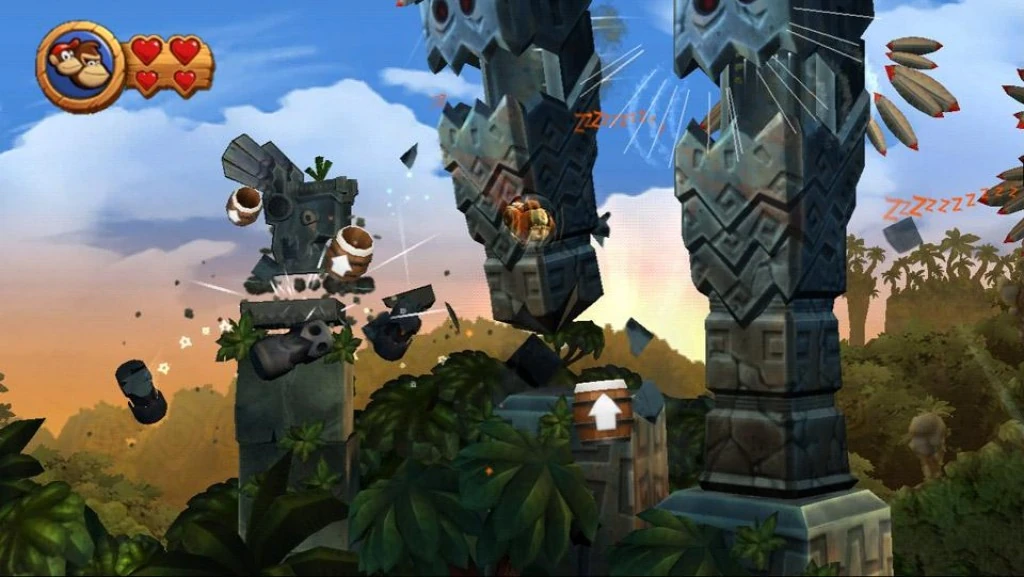
| Notable Feature(s) | The progress through this level is made mostly by barrel cannons. And giant Screaming Pillars first appear in this level. |
| Enemies Encountered | Frogoons, Awks, Tiki Zings, Rawks, Screaming Pillars |
| Game(s) | Donkey Kong Country Returns, Donkey Kong Country Returns 3D |
| First Appearance | Donkey Kong Country Returns (2010) |
| Latest Appearance | Donkey Kong Country Returns 3D (2013)
|
Canopy Cannons is the fifth level in the games Donkey Kong Country Returns and Donkey Kong Country Returns 3D, as well as the fifth level in the Jungle world of Donkey Kong Island. It is preceded by Sunset Shore and followed by Crazy Cart.
Overview[]
In this level, most of traversal is made by using barrel cannons. When blasting from these barrels, it is necessary to use good timing to avoid enemies and hazards, and collect items. This level is the first one to feature giant Screaming Pillars.
Walkthrough[]
The level begins in the jungle, where there are many yellow plants growing all over the place. Some fallen stone pillars are also on the pathway through the jungle, as well as two Frogoons that are followed by an Awk. The edge of a cliff is immediately after the Awk, but a barrel cannon floats near it. If the Kongs get in and shoot themselves out of it, they land in a barrel cannon in the background that shoots them through a stone wall to a moving barrel. The barrel can be missed, causing the heroes to fall down into the pit below. The barrel can move the Kongs upwards through another stone wall and to the letter "K" of the K-O-N-G Letters. A barrel on the other side of this stone wall to catch and shoot them to a barrel in the foreground. This moving barrel can aim the heroes at another barrel, which can then blast them to the following barrel when it has moved in the correct area. The barrel it shoots the primates to does not move, but it aims directly at the target: the next barrel. This barrel is surrounded by many bananas, a Banana Coin and a Tiki Zing. When the Kongs shoot to the barrel, the foe and the objects fall, allowing the barrel to move under the next barrel, which they must shoot to. This barrel aims directly at the following barrel, but a spiky block over a bouncy drum is between them.
When the block falls downwards, they can shoot to the next barrel, which can them blast them on solid ground on an Awk. In this area, there are many red and helicopter-like plants at the edge of the cliff and another yellow plant next to a dandelion. The yellow plant contains the first Puzzle Piece. After a group of spikes, the primates come up to two Frogoons and a DK Barrel. Barrel cannons are in the gap ahead of this tree canopy area. The three barrels each tilt in three different directions: when they are aiming at the correct angle, the Kongs can shoot to reach the next barrel. The first barrel in this group can shoot the group to the letter "O", which is right above it, or the barrel positioned above it to the right. This barrel can then shoot them down or to the third barrel that is to the right of it. Shooting straight down the pit, the Kongs will find two hidden autofire barrels and the second Puzzle Piece. After being shoot back into the first barrel, the heroes must reach to the third barrel. This final barrel in the area is next to a stone wall that supports the above platform which can be shot to in order to progress. If the heroes shoot at the wall here, they can also bounce back while grabbing a Banana Coin. On the platform above this, the primates can find two Rawks and a yellow plant that can be broken open to reveal and item. Just before the Frogoon, there is a flat platform on the ground. If the primates pound on this platform, they wil be blasted into a Bonus Room. There, the heroes must use two barrel cannons, while avoiding an autofire barrel, to collect all eighty bananas and two Banana Coins within thirty seconds and make the third Puzzle Piece to appear. After the Bonus Room, the Kongs must go left and past some Awks on the ground and a Rawk on a elevated platform. The yellow plant close by possesses the fourth Puzzle Piece. Moving forward, at the end of the area is the Tutorial Pig, who marks the checkpoint.
A DK Barrel is immediately after this, followed by a few bouncy and red flowers. A trail of bananas are above each of them, and a barrel cannon is above the last of the flowers. It can shoot the Kongs past a bouncing and spiky block, when the obstacle jumps upwards, to get to another barrel. This cannon can shoot them farther into the background, where there is another barrel that is surrounded by bananas, a Banana Coin, and a Tiki Zing. The two barrels following this are surrounded by similar objects, including the letter "N" and an Extra Life Balloon, which fall when the barrels are reached. Careful timing is necessary to shoot from the barrels and collect the letter. Eventually, the heroes reach a barrel that can shoot them above another bouncing block to access another cannon that aims into a stone wall. They can shoot through this wall and come up to a moving barrel while in mid-air, which they must try to land in. This barrel, along with the barrels following it, moves back and fourth, so the Kongs must shoot out only when it is aiming towards the next barrel to avoid falling. After landing into the fourth barrel, it is possible to see a single banana at the top of the screen. The primates must shoot towards this banana to landing into a hidden barrel cannon that shoots them at the fifth and final Puzzle Piece. After blasting through many different barrels and some stone walls, the Kongs reach an autofire barrel that blasts them to a barrel that is able to shoot them into the background through some stone structures.
On the other side of the structures is another cannon, which can shoot them into the air so they can reach a moving autofire barrel, which has the some bananas and letter "G" above it. The primates must avoid the autofire barrel to collect the letter. After landing into the autofire barrel, it can fire them to the next barrel, which then blasts them through another stone wall. When they shoot through this, the heroes will reach the area with many giant Screaming Pillars behind them. They must quickly shoot through several barrel cannons towards the foreground to avoid the enemies that can defeat them instantly. The last two of these barrels aim at different angles, while the ones before it only aim to the next barrel. When the Kongs shoot to land, they crash into a stone structure that they cause to fall over. They can use this to help them reach a higher area, where there are two dandelions, followed by several bouncy and red flowers. The primates can bounce along these to get to a barrel cannon at the end of the area. Autofire barrels are positioned between the flowers to help the Kongs in case they fall between the plants. The barrel cannon at the end of the area can shoot the primates into a nearby statue, when its mouth is open, which has a barrel cannon in it. This cannon can blast them to other cannons inside the structure. Eventually, they shoot out of the statue and blast to the level's final barrel cannon, which aims past a bouncing and spiky block to the Slot Machine Barrel. If the primates hit this barrel, the level is completed.
Enemies[]
- Frogoon: 5
- Awk: 5
- Tiki Zing: 3 (regular size)
- Rawk: 3
- Screaming Pillar: 5 (big size)
Items[]
- DK Barrels: 2
- Banana Coins: 7 (counts 2 in the Bonus Room, does not count three or more consecutive jumps on enemies)
- Extra Life Balloons: 1 (does not count eight or more consecutive jumps on enemies)
K-O-N-G letters[]
- K: When the Kongs reach the third barrel cannon in the level, they must shoot towards the cracked part of the stone wall of come across the letter "K".
- O: Immediately after the first Puzzle Piece and the first DK Barrel, the Kongs can find a barrel cannon with the letter "O" above it. They can shoot to the letter with the barrel.
- N: In the third set of barrel cannons, the heroes shoot to some barrel cannons that are surrounded by collectibles. After reaching the fourth barrel, the letter "N" is orbiting around the fifth one. The primates must use good timing to shoot from the barrel and collect the letter.
- G: After the Kongs blast into the background before coming up to the giant Screaming Pillars, the barrel they are in aims upwards towards a trail of bananas and the letter "G". The heroes must avoid the autofire barrel hovering past the letter to get it.
Puzzle Pieces[]
- 1: When the Kongs reach the first area of land after shooting through the first set of barrel cannons, they must pound on a yellow plant to reveal a Puzzle Piece.
- 2: In the area of barrels where the letter "O" is located, the heroes must blast to the second barrel that is above the middle of a large gap. If they shoot downwards into this gap, they can find a hidden autofire barrel that can blast them to a Puzzle Piece. It then shoots them to a barrel that fires them back up to the first barrel cannon in the area.
- 3: When the Kongs reach the area of land after the area with the letter "O" and the second Puzzle Piece, and going past two Rawks, they can find a flat platform on the ground. If they pound on it, they fall through the ground and be blasted into a Bonus Room, where they must collect eighty bananas and two Banana Coins while shooting back and forth between barrels. An autofire barrel moves around in the middle of the area to shoot the heroes out of the room. If they collect everything within thirty seconds, a Puzzle Piece appears at the exit.
- 4: After the Kongs exit the Bonus Room, they must head backwards and pass a few Awk enemies. A yellow plant grows near some spikes that contains a Puzzle Piece.
- 5: In the third set of barrels, after go past two bouncing and spiky blocks and a stone wall, in the fourth barrel cannon, it is possible to see a banana floating at the corner of the screen. If Kongs shoot towards this banana instead of the next barrel, they can find a hidden barrel that blasts them to the fifth and final Puzzle Piece.
Puzzle[]
The puzzle of Canopy Cannons is of a strawberry on a light green background. When all the pieces are found, the Awk artwork will be added to the Critters 1 Gallery of the Image Gallery in the Extras menu.
Time Attack Medals[]
- Shiny Gold: 01:01.00
- Gold: 01:02.00 (01:10.00 in the Japanese version)
- Silver: 01:13.00 (01:18.00 in the Japanese version)
- Bronze: 01:35.00 (01:40.00 in the Japanese version)
Gallery[]
")
")
")
")
")
")
")
")
")
")
")
")
Videos[]
 (25 KB)")
 (21 KB)")