| |
| World(s) | Jungle |
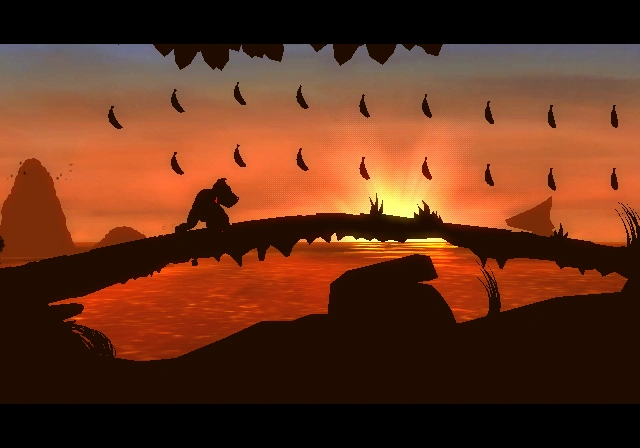
| Type | Silhouette |
| Music Theme(s) | Palm Tree Groove |
| Animal Buddies | None |
| Bonus Room(s) | None |
| Puzzle Pieces | 5 |
| Notable Feature(s) | The first silhouette type and locked level in both games. |
| Enemies Encountered | Frogoons, Awks, Mimics, Hopgoons, Tiki Goons |
| Game(s) | Donkey Kong Country Returns, Donkey Kong Country Returns 3D |
| First Appearance | Donkey Kong Country Returns (2010) |
| Latest Appearance | Donkey Kong Country Returns 3D (2013)
|
Sunset Shore is the fourth level in the games Donkey Kong Country Returns and Donkey Kong Country Returns 3D, as well as the fourth level in the Jungle world of Donkey Kong Island. This level is unlocked by buying the Map Key from Cranky Kong's Shop in this world. It is preceded by Tree Top Bop and followed by Canopy Cannons.
Overview[]
This level is unique, as everything is a silhouette against the sunset background, including main characters, enemies, platforms and items. It is possible to interact with background silhouettes to reveal hidden items. This level also features Awks, Hopgoons and Mimics.
Walkthrough[]
At the beginning of the level, the Kongs must go all the way to left to find a hidden area with the first Puzzle Piece and some banana bunches. Going forward, there is a straight pathway leading to the first DK Barrel in the level and a cracked area of land that can be pounded by the Kongs to reach the letter "K" of the K-O-N-G Letters. Eventually, the primates travel down a hill, and then come across a land bridge with some Awks on it. Two rows of bananas are in the air here. Farther on is another hill that curves downwards. A cracked piece of land is on it with a heart under it, and Frogoons before it. The heroes soon make it to a raised and solid platform with a Mimic on it. Large, stair-like platforms are after it that lead downwards. Bananas move in a circle here, while a Mimic attacks from behind the items. Soon, the Kongs find themselves traveling up a long hill infested with Hopgoons, until they reach a bridge. Many more Hopgoons are on the bridge, along with three tilted platforms that are positioned vertically. The Kongs can pound close by them to make them horizontal temporarily so they can reach the items above. The letter "O" is above the second platform in the middle of the bridge. After the primates cross the bridge and head over a raised platform, they make their way through a straight and relatively flat area with Mimics and a Awk. After going up a hill with two long rows of bananas above it, the heroes pass the Tutorial Pig, who marks the checkpoint.
A few stair-like platforms lead up to the second DK Barrel of the level. A switch is at the top of the ground below a tunnel with a sculpted sun figure. If the Kongs step on the switch for some seconds, the sun will shine brightly and the ground will crumble. The heroes will fall down into a underground area with many bananas and the second Puzzle Piece. Getting into the barrel cannon will take the primates back to ground area above. The Kongs must go left to see the letter "N" and use some stair-like platforms with Tiki Goons to reach the letter. Moving on, tt the end of this rather flat area, which has some bananas moving in a circle, the heroes will find Awks and a Frogoon over an elevated platform. Going past the Awks on the ground, there is a hidden area with the third Puzzle Piece.
Climbing some ledges to proceed to a different part of the level, the primates will reach to more Mimics and dandelions, which can give items when blown on. Reaching to another bridge that holds the Kongs over the land below, there are more Hopgoons and Tiki Goons, along with more two tilted vertical platforms over each other. After pounding close by these platforms, the heroes must quickly use them to reach the fourth Puzzle Piece above the screen. The bridge is not completely straight: gaps are between some of the bridge parts, with a Frogoon and an alcove, which is covered by a cracked piece of land, with the letter "G" in it. Ahead of the bridge is a group of bananas that move in a circle and some enemies. At the end of the long, rather empty pathway is a pillar, just before a dragon statue. The Kongs must use the pillar to jump over the statue. At the end of this area, going past the Frogoon and Tiki Goon, there is a hidden and elevated alcove with the fifth and final Puzzle Piece. Going back, If the heroes pound the pillar completely into the ground, the mouth of the dragon statue will crumble, revealing a path. The primates must journey through this path to access a small corridor with yellow plants and reach the Slot Machine Barrel at the end of it. Hitting the barrel will end the level.
Enemies[]
Items[]
- Hearts: 4
- DK Barrels: 2
- Banana Coins: 12 (does not count three or more consecutive jumps on enemies)
K-O-N-G Letters[]
- K: At the beginning of the level, before the first DK Barrel, there is a cracked platform on the ground above a small alcove, which holds the letter "K". The Kongs can pound on the ground to get into the alcove and then get the letter.
- O: When the primates make it to the first part where they cross a wooden bridge, they must pound on the second tilted platform in the middle of the area to make it turn horizontal. This way, they can jump on and reach the letter "O" that is above.
- N: In the area after the second Puzzle Piece with the many stair-like platforms that lead downwards, the primates must jump off of the last raised platform to reach the letter "N" that is high in the air. Collecting the second Puzzle Piece makes the Kongs to go past the area with the letter.
- G: After the fourth Puzzle Piece, between one of the gaps in the bridge near the end of the level, the primates can find a cracked piece of land above an alcove. If they pound on it, the ground breaks and they fall into the hole with the letter "G".
Puzzle Pieces[]
- 1: At the beginning of the level, the Kongs must head backwards to find the first Puzzle Piece in a hidden alcove in a wall.
- 2: After the checkpoint, the heroes come under a strange tunnel area with a switch in it. If they stand on the switch for a few seconds, it sinks into the ground. When this happens, the sun begins to shine brightly, and then the ground breaks, dropping them into a hidden area underground. Many bananas and banana bunches are here, as well as the second Puzzle Piece. Getting back to ground area above makes the primates to go past the area with the letter "N".
- 3: After the letter "N", the Kongs will reach to a area with some floating bananas in circle, Awks and a Frogoon over an elevated platform. Below the platform and going past the two Awks, there is a hidden alcove with the third Puzzle Piece.
- 4: At the beginning of the bridge after the third Puzzle Piece, the primates can notice two tilted vertical platforms. They turn horizontal for a few moments if pounded on. When they are in this state, the heroes must climb up them to reach the fourth Puzzle Piece.
- 5: Before the heroes pound on the tall pillar to open the mouth of the dragon statue at the end of the level, they must use it to jump on top of the object. If they continue over the head of the statue, they approach a Frogoon and a Tiki Goon. In a wall behind the enemies, there is a alcove with the Puzzle Piece.
Puzzle[]
The Sunset Shore puzzle is of a strawberry on a light green background. When all pieces are found, the Screaming Pillar artwork will be added to the Tiki Gallery of the Image Gallery in the Extras menu.
Time Attack Medals[]
- Shiny Gold: 00:50.00
- Gold: 00:53.00
- Silver: 01:03.00
- Bronze: 01:45.00 (01:25.00 in the Japanese version)
Gallery[]
")
")
")
")
")
")
")
")
")
")
")
Videos[]
 (15 KB)")
 (16 KB)")
Trivia[]
- In the section after the letter "O" and some Hopgoons, if the Kongs stand still for a few seconds in the middle of a raised platform, some rock formations in the background will merge into a banana-like silhouette. The sun will shine on the silhouette and the rock formations will break apart and drop some Banana Coins and bananas over the primates.